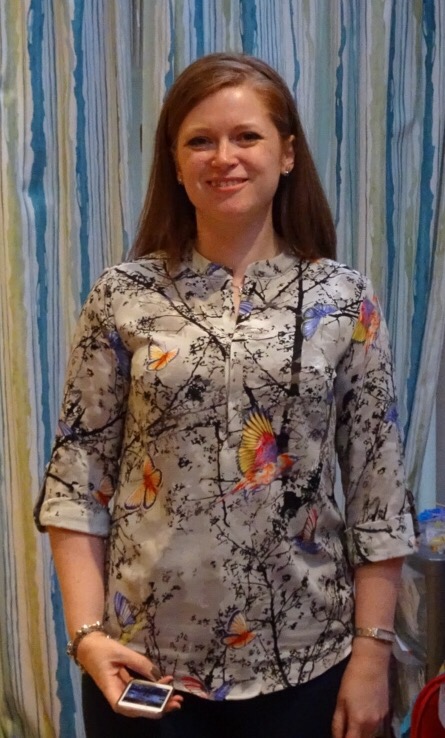
Hi there! Today’s make is one I’m both proud of and slightly sheepish about.
I’m sheepish because this has been on the to sew list, complete with fabric choice, for several months now. This is getting to be more frequent because I just have SO MANY things I want to make and have supplies for. This is actually something I need to address and so I’m attempting to stick to a no-fabric-buying ban until Sew Up North in 2 months. Not sure how that’s going to go, but I’m going to try!

The pattern for this came free on Sew Now magazine quite early on (maybe issue 2 or 3?) I loved it straight away, as this is a style I buy RTW regularly and love. It’s Threadcount 1617 and it’s 4 different pull over shirts. I love this style; it feels the perfect compromise in my dress down office. It makes jeans feel smart enough for me without being so smart I look daft.

The fabric came from Adam Ross, whose online presence seems to have increased massively over the last few months. Don’t know if that’s just who I follow on Instagram, but they have a good range of reasonably priced fabrics in all sorts of prints. Apparently the bricks and mortar store is incredible… I need to not go there for some time!

The fabric is a polyester print with really, really good drape. This means that sewing it is approximately like trying to sew water! It’s also not that keen to press which can be problematic when you’re trying to make a shirt. However, I got through this make by reminding myself that, once complete, I would never, EVER have to iron it again, which made it rather more bearable.

I chose to make view C which actually has full length sleeves but they roll up and are fastened with a tab.

There is a placket front but no front buttons; we’ll come back to that. There is a back yoke and two piece sleeves, which I’d never done before. This meant that, for my chosen view, I needed to cut 9 pattern pieces, which is quite a few compared with my recent jersey makes.
I cut out using my mat and rotary cutter and for once, set up on the dining table so that I could be more in control of my movements. This involved resting the excess slippery fabric on a selection of kitchen chairs as this stuff really, REALLY didn’t want to stay still. I have now ordered some spray starch and would use it another time, but I survived.

I chose to use tailor’s tacks for all the pattern markings as I didn’t think anything else would stick to the slightly crepe-y finish of this fabric. I didn’t think too much about pattern placement, other than a cursory glance to ensure I didn’t end up with a butterfly prominently on one boob, just focused on cutting out of my fabric which was, as usual, slightly shorter than the pattern called for. As usual, I had loads left.

The only place I did briefly think about pattern placement was on the back yoke and I love the bird that now sits there.

My measurements sat between the 10 and 14 but there was lots of ease so I graded between the 10 and 12 and am really pleased with the finished fit.
The pattern instructions are more like a big 4 than an indie pattern and in some places I had a little head scratching. I pretty much followed them, including on the yoke, but I think another time I would follow a tutorial for the burrito method as I think that might be easier and involve less hand stitching.
The pattern took quite a while because there was a lot of hand stitching called for and because I chose the daft fabric. I overlocked every seam as I went to prevent fraying, which this material definitely called for. I took a 3/8″ seam allowance down the side seams to give myself some extra hip room which worked out nicely.

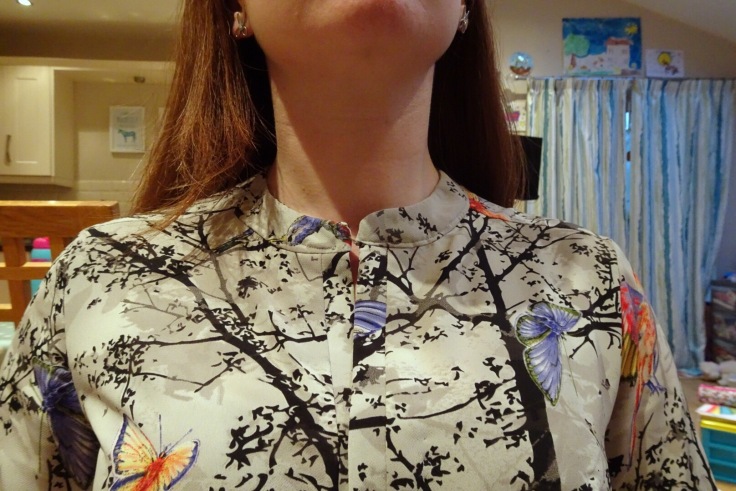
The only other thing I changed was to add some press studs to the front placket. There are no front fastenings at all on this version and frankly I’d rather not be flashing my rib cage, let alone my bra! A couple of tiny press studs hidden down the front keep it fastened high enough up to be decent, which makes it sit just as I like it.

And I really, really do like it. It feels like a “proper” garment, with lots of detail and multiple pieces and despite a little bit of wonkiness on the collar (which WOULD NOT press as instructed; fabric choice again!) I don’t think it looks home made in any way. The print is fabulous, I love the pop of rainbow colours against the greys and blacks, and I will absolutely be wearing this to death!

It was also really nice to have a freebie pattern be rather more demanding, instead of being somewhat lacking in style because they’ve tried to cater to everyone; thanks Sew Now for that!
Becca x


You did brilliantly with this tricky fabric!!!
LikeLiked by 1 person
Thank you! I think it’s been worth it; I brought it with me this week on my course then realised it was a more formal dress code so haven’t worn it; just put it back in the suitcase and it looks no worse for wear. Worth the pain!
LikeLiked by 1 person
I’ve now finished mine of this same shirt – inspired by your Instagram pics to get sewing after I’d had this pattern traced ready for ages. I ignored the instructions for the yoke and made up a method that wasn’t the burrito way nor the way Lisa Comfort describes in her Alex shirt YouTube video! I couldn’t quite get my head around the instructions for the neckband collar either so Googled similar and checked what they said!
Yours looks great! I was going to brave putting a button hole or two in but maybe I’ll put those poppers on like you have!
Great fabric choice!
LikeLiked by 1 person
Thank you! I really need to be braver in just ignoring what the instructions say if I think there’s a better way; I tend to do it the second time I make something rather than the first though x
LikeLike
Its beautiful. I’m thinking that I need to make some time to sew a springtime shirt!
LikeLiked by 1 person
Thank you! I think I need many more of these!
LikeLike
Beautiful job!! I am making this top too, and yours looks wonderful!
LikeLiked by 1 person
Thank you! 😊
LikeLike
Lovely 🙂 big fan of the bird at the back yoke!
LikeLiked by 1 person
Thank you! I love that bit, must tie my hair up more often!
LikeLike
Beautiful shirt and I love the bird fabric!
LikeLike
This is beautiful!! The construction, finishing and fabric, and everything!
LikeLiked by 1 person
Thank you! 😊
LikeLike
It looks fab! I really like your button. Don’t suppose you got those online somewhere I can shamelessly copy did you?
I’m making an Alex shirtdress at the mo and I used the Grainline Alder Sewalong post about the Burrito method (https://www.grainlinestudio.com/2014/08/22/alder-sew-along-day-8-yoke-method-2/) for the yoke and would definitely recommend it.
LikeLiked by 1 person
Ooh, thanks for the tip! Sadly no, I got the in Booths of Farsley which is a fab little haberdashery full of all sorts of random and generally quite old stuff?
LikeLike
I really admire you for persevering with a tricky fabric – it was definitely worth it because you look great in this top! Hope you’ve enjoyed your training week – and are now back home for the weekend! X
LikeLiked by 1 person
I’m home safe Jane, thanks! I am pleased with it; it may be a little while before I make another but I probably will at some point!
LikeLiked by 1 person
Enjoy the long weekend! X
LikeLiked by 1 person
You too! X
LikeLike
Stunning! Beautiful fabric and a finished garment that looks super pro! Well done.
LikeLiked by 1 person
Thank you 😊
LikeLiked by 1 person
Lovely choice of fabric and well worth all the hard work using a slippery fabric. The Bird placement is spot on too! 😃
LikeLiked by 1 person
Thank you! 😊
LikeLike